
In this article, we’re embarking on an exciting journey to create the ultimate bike camper – a compact yet fully-equipped mobile shelter designed for adventure seekers who crave both comfort and convenience on their travels.
What sets this camper apart from the rest? It’s not just about providing a place to sleep; it’s about revolutionizing the biking and camping experience with cutting-edge features that redefine what’s possible on the open road. Get ready to experience the freedom of the open road like never before – the journey starts here.
Build Frame
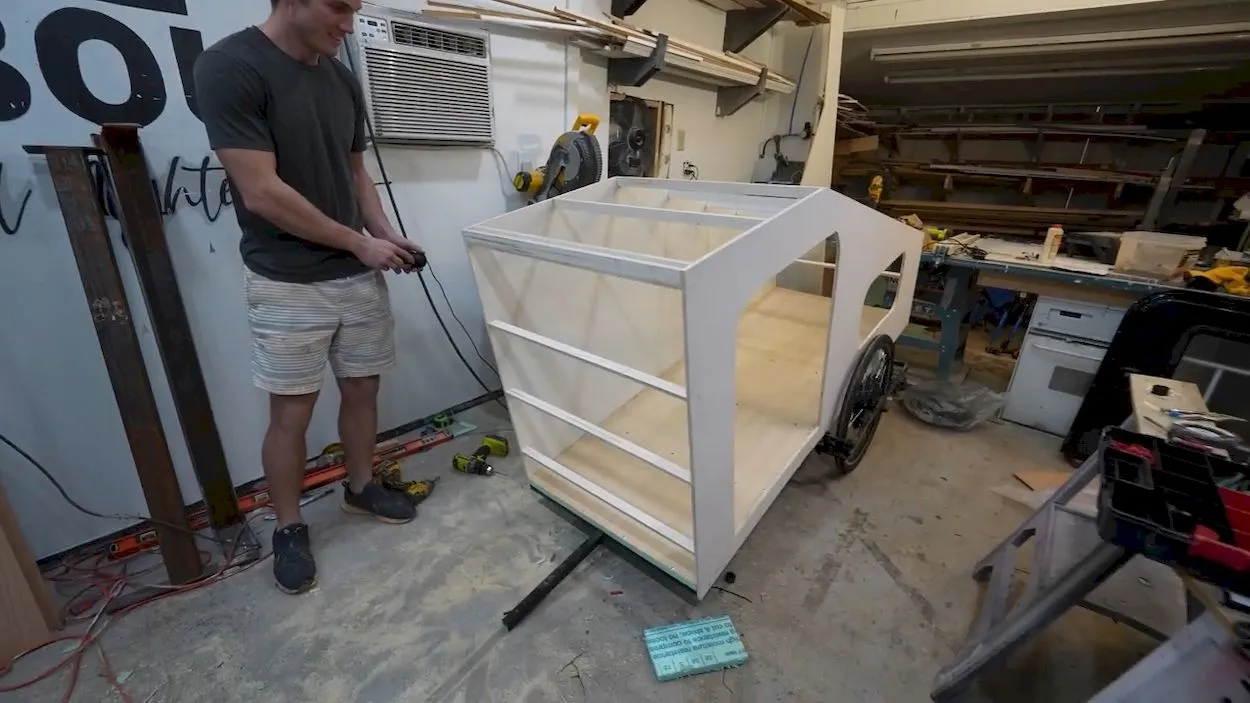
Building a bike camper is an ambitious project, one that requires ingenuity, creativity, and a bit of elbow grease. The first step in this endeavor is crucial: constructing a sturdy yet lightweight frame. This frame serves as the foundation upon which the entire camper will be built, supporting its structure and ensuring durability during travel.
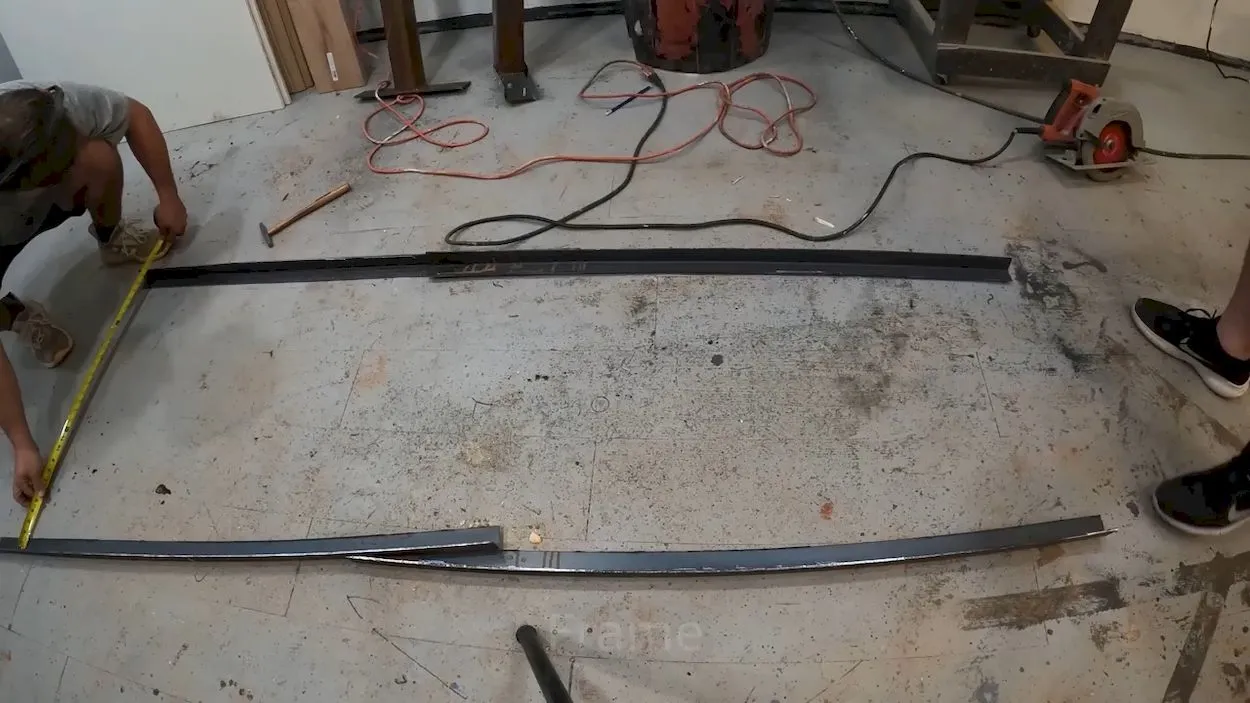
To achieve this, the creator opts for a frame that combines strength with lightness. While aluminum frames are common in many trailers, they decide to reinforce their frame with wood, creating a structure that is not only a hundred times stronger but also perfectly lightweight. This choice reflects a balance between durability and practicality, essential qualities for any camper intended for biking adventures.
With the frame in place, attention turns to the dimensions and layout of the camper. A spacious base measuring 30 by 80 inches is chosen, providing ample room for the occupant to lay comfortably, whether widthwise or lengthwise. This thoughtful consideration of size ensures that the camper is both functional and comfortable, accommodating the needs of its user.
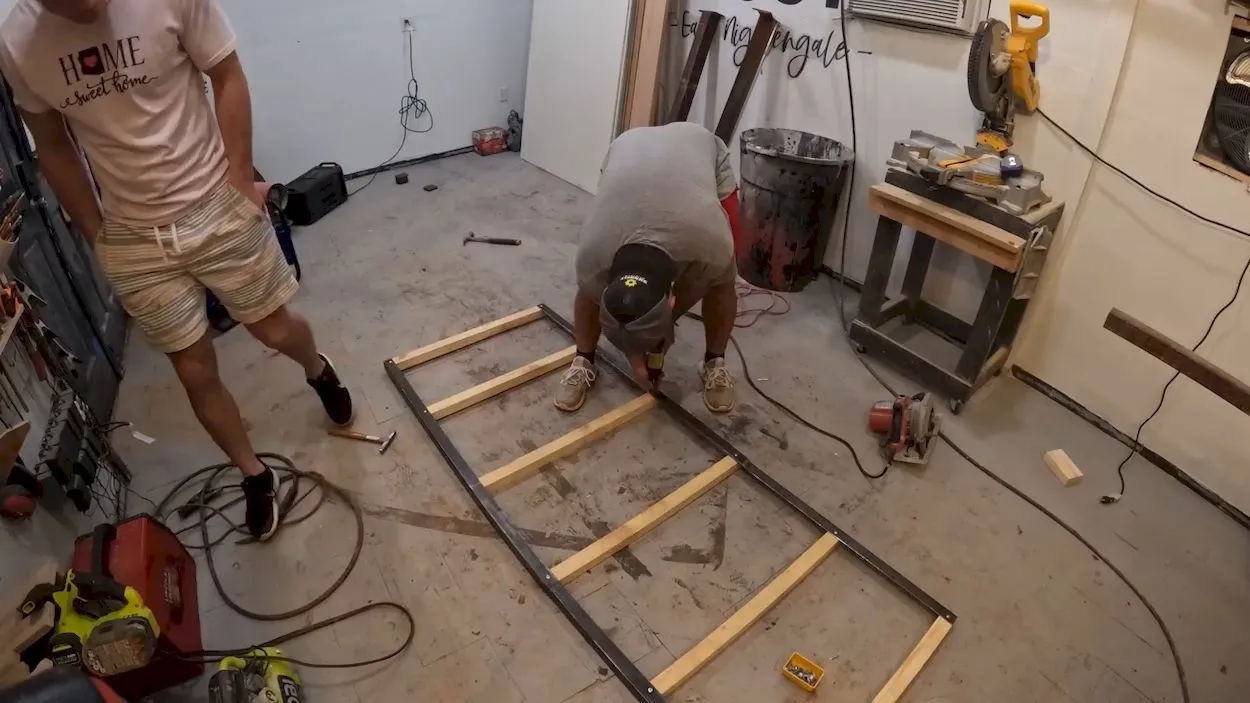
Next comes the crucial task of mounting the bike wheels. Unlike typical trailers, where the wheels may only require support from one side, this camper necessitates support from both sides to prevent tilting and potential damage during transit. This attention to detail demonstrates a commitment to safety and longevity, ensuring that the camper can withstand the rigors of the road.
With the frame and wheel support in place, the focus shifts to building the base. A layer of foam is laid down first, serving as insulation to keep moisture and water out. This is followed by a layer of plywood, providing a sturdy foundation for the camper. Despite the addition of these materials, the weight remains manageable, a testament to the careful planning and construction of the frame.
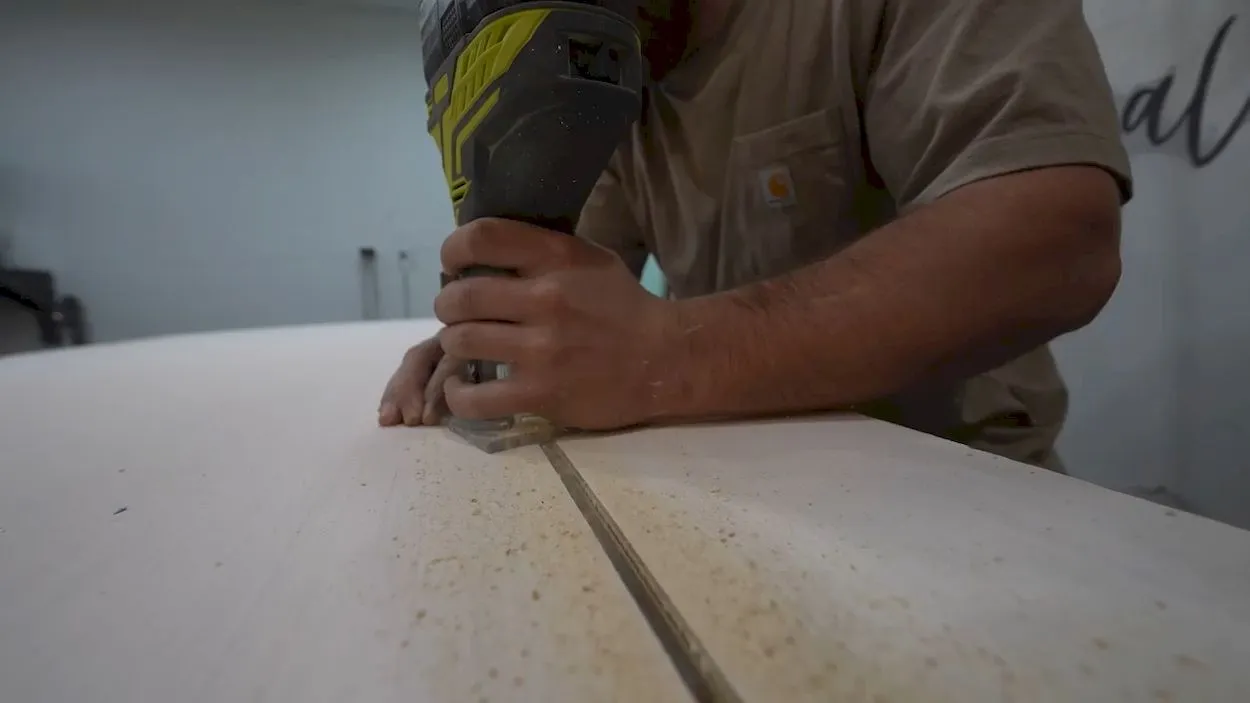
As the base nears completion, the attention turns to the walls. While foam could save weight, concerns about security lead to the decision to use half-inch plywood instead. This choice prioritizes safety and peace of mind, ensuring that the camper provides adequate protection against potential intruders.
Finally, the roof is constructed using a similar method as the walls, with slightly narrower studs to accommodate the reduced weight requirements. With each step, the camper takes shape, evolving from a mere concept into a tangible reality. And with the completion of the framing for the roof, the world’s first practical bike camper begins to emerge, a testament to the power of innovation and determination.
Motor wheels
Alright guys, this is it – one of our two 1,000 watt motors that will be powering this camper,” announces the creator with a mix of excitement and anticipation. The sheer power emanating from the motors is palpable, hinting at the thrilling adventures that lie ahead. With a thousand watts of energy at their disposal, the wheels of the camper are poised to spin effortlessly, propelling the bike and its precious cargo forward with ease.
The demonstration of the motors in action is nothing short of impressive. As the power is engaged, the wheels start to turn, almost as if they have a life of their own. It’s a sight to behold – the sheer force generated by the motors is enough to push whatever bike is pulling the camper, showcasing the ingenuity and innovation behind this project.
“This is ridiculous,” exclaims the creator, perhaps overwhelmed by the sheer power and potential of their creation. But it’s also a moment of triumph – a testament to their hard work and dedication to pushing the boundaries of what’s possible in the realm of bike camping.
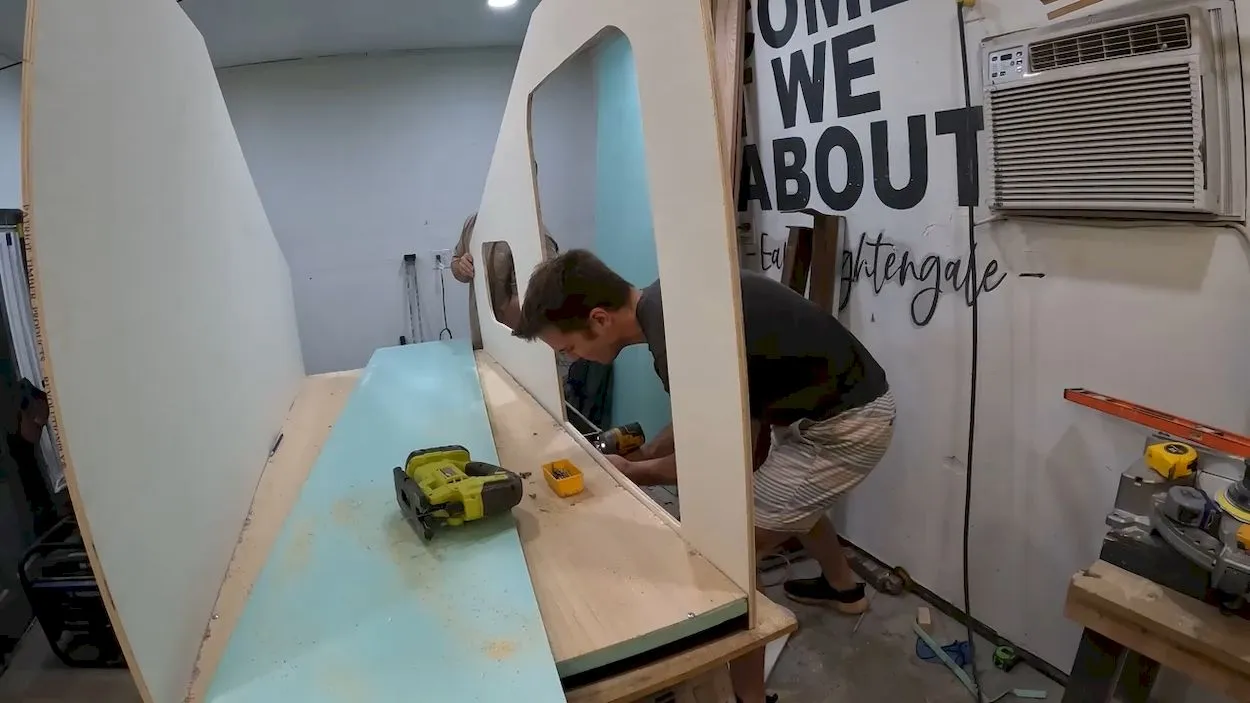
With the motors successfully installed and tested, the focus now shifts to the next phase of construction: putting in the ceiling. This marks another crucial step in the camper’s development, as the ceiling serves both functional and aesthetic purposes. It provides shelter from the elements while also adding a finishing touch to the interior space.
Electric
Now that the inside roof is securely in place, it’s time to tackle the electrical wiring for the sidewalls. Given that the sidewalls consist of just a single piece of wood, there’s limited space to conceal the wiring. However, with careful planning and precision, the creator navigates this challenge adeptly, ensuring that all electrical components fit snugly between the ceiling and the roof.
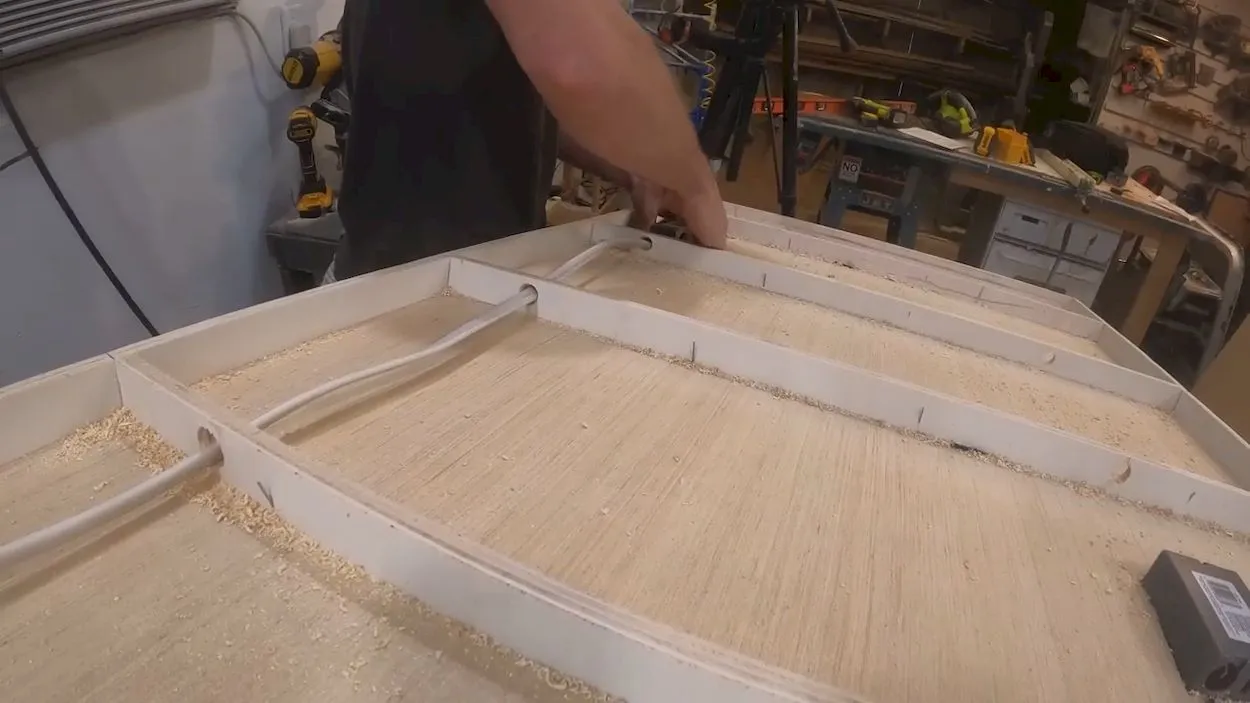
To minimize weight while maintaining functionality, standard 14-gauge RX wire is chosen for the camper’s electrical system. This decision reflects a balance between reliability and practicality, recognizing that every ounce counts when it comes to bike camping.
With a meticulous approach, the creator begins installing the electrical components. Two plugs and a switch are carefully integrated into the sidewalls, each serving a specific purpose. The first plug is dedicated to powering the TV, providing entertainment during downtime on the road. Next, a light switch is added, offering control over the camper’s illumination. Finally, the last plug, situated on the opposite side of the camper, offers versatility, allowing users to charge their phones or plug in additional devices as needed.
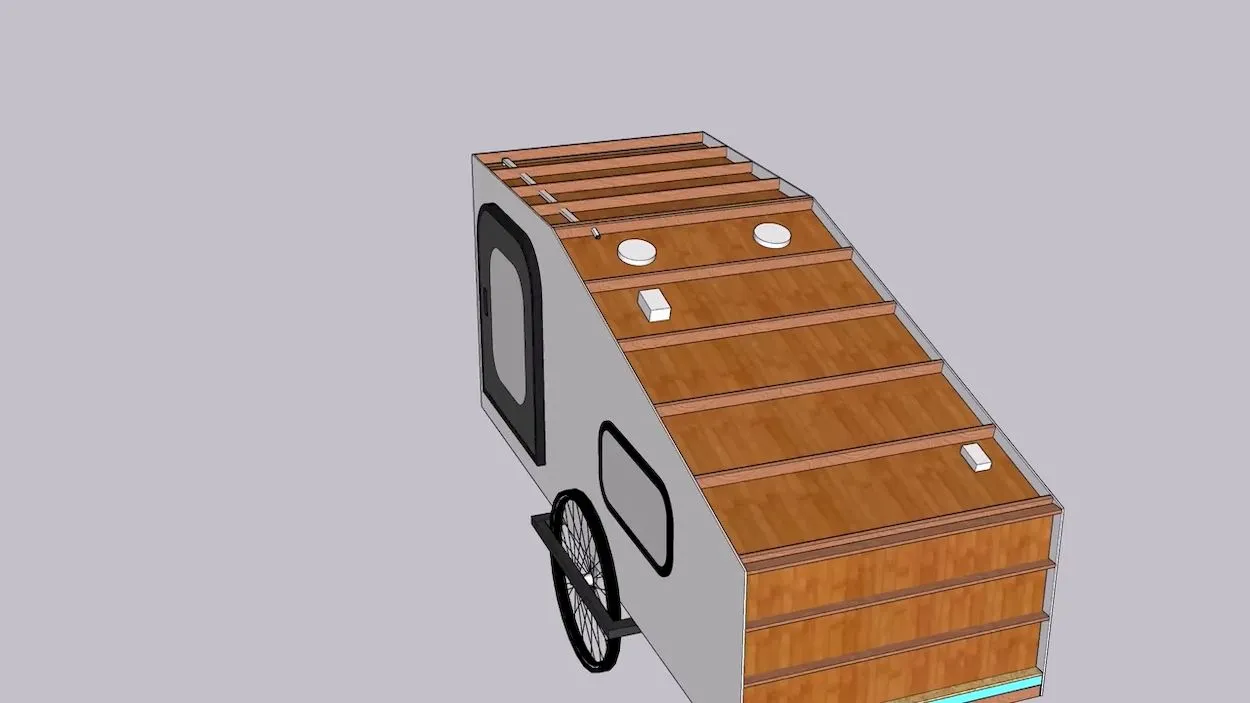
In addition to these essential components, two 3-inch can lights are installed to illuminate the interior space. The size of these lights is chosen deliberately, perfectly complementing the compact nature of the camper and ensuring optimal lighting without adding unnecessary bulk.
With the electrical wiring complete, the camper takes another step towards functionality and comfort. Each component carefully integrated into the design serves to enhance the camper’s usability while maintaining its lightweight and streamlined profile. As the finishing touches are added, the camper begins to embody the perfect balance of form and function, ready to embark on adventures both big and small.
Insulation and Waterproof
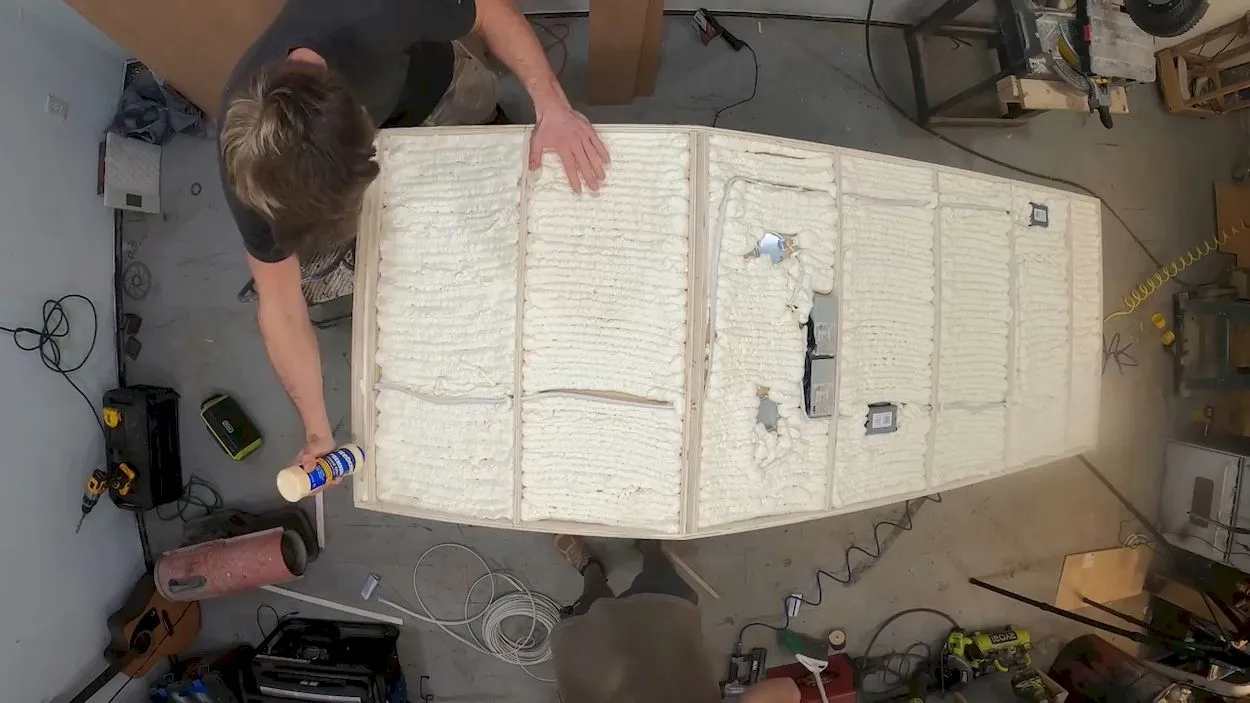
With the electrical work completed and the lights installed, the next step in the camper’s construction journey is insulation. For optimal insulation, the creator opts for spray foam, recognizing its superior properties compared to traditional insulation materials. With an impressive R-value of 7 per inch, spray foam far surpasses the insulation typically used in household applications, providing excellent thermal efficiency. Additionally, its waterproof nature makes it an ideal choice for creating a moisture barrier, ensuring the camper remains dry and comfortable even in inclement weather.
Once the insulation is applied and dried, attention turns to covering everything up with the exterior roof. To ensure the roof remains securely in place, the creator employs a thorough method, gluing everything down for added stability. Quarter-inch plywood is once again chosen for its lightweight properties, contributing to the overall efficiency of the camper’s design.
With the roof securely attached, the exterior of the camper begins to take shape. The overhang, a signature feature from previous builds, is retained, providing both aesthetic appeal and practicality. Using a router, the overhang is easily shaped, adding a touch of finesse to the camper’s exterior.
With the exterior construction nearing completion, the focus shifts to finishing touches. Any remaining gaps or nail holes are filled with Bondo, ensuring a smooth and polished surface. A light sanding follows, further enhancing the camper’s appearance and preparing it for the final step: waterproofing.
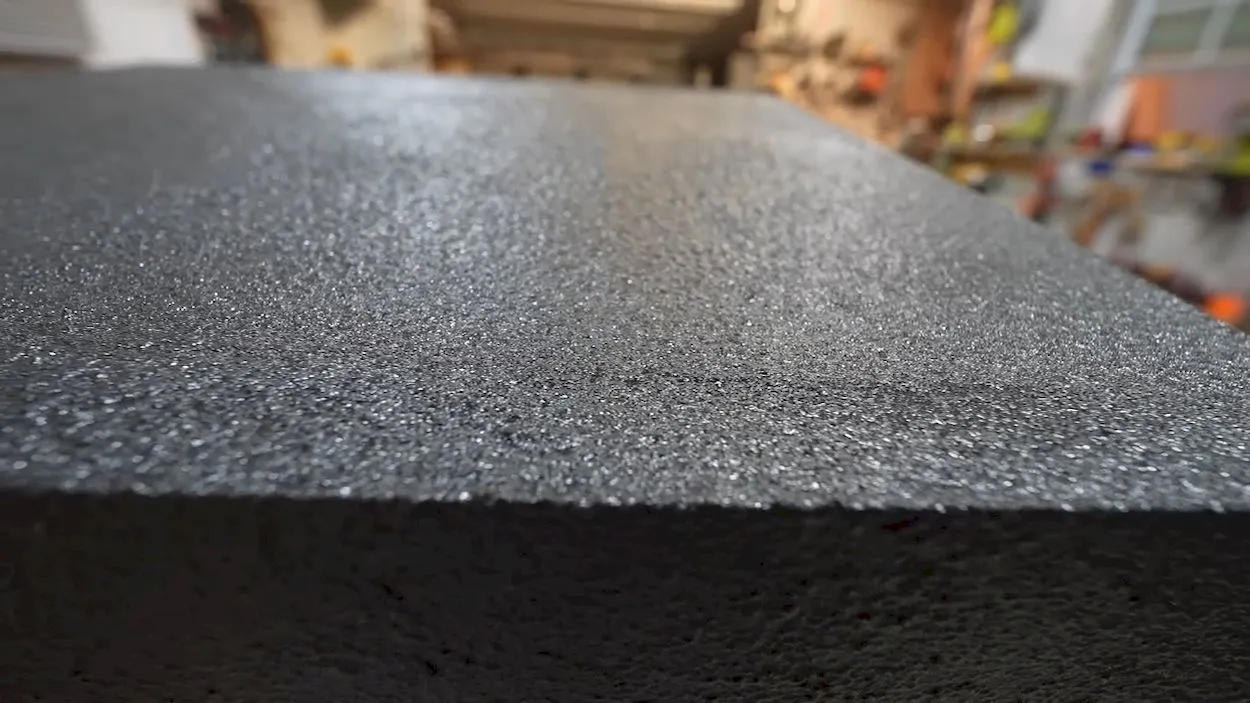
Once again, the creator turns to a trusted solution for waterproofing: truck bed liner. Known for its durability and resilience, this coating provides a robust protective layer, ensuring the camper is ready to withstand the elements. With the bed liner applied, the camper is left to cure for one to two days, allowing the coating to fully harden and provide long-lasting protection.
As the camper undergoes its final transformations, it becomes clear that both form and function have been carefully considered throughout the construction process. From insulation to waterproofing, each step has been executed with precision, resulting in a camper that is not only beautiful but also built to last. And with the finishing touches complete, the stage is set for countless adventures on the open road.
Inside work
As the exterior construction of the camper nears completion, it’s time to turn attention to the interior. This phase of the project brings a sense of excitement, as the camper starts to take on its final form and become a livable space.
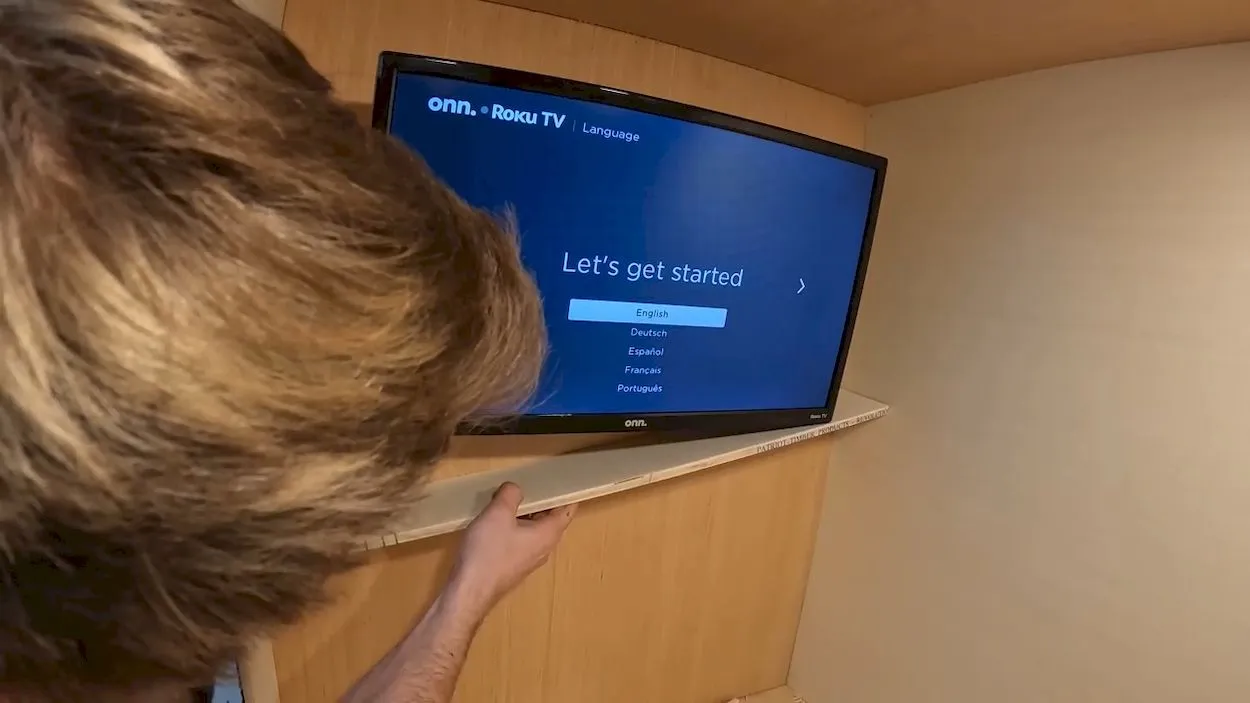
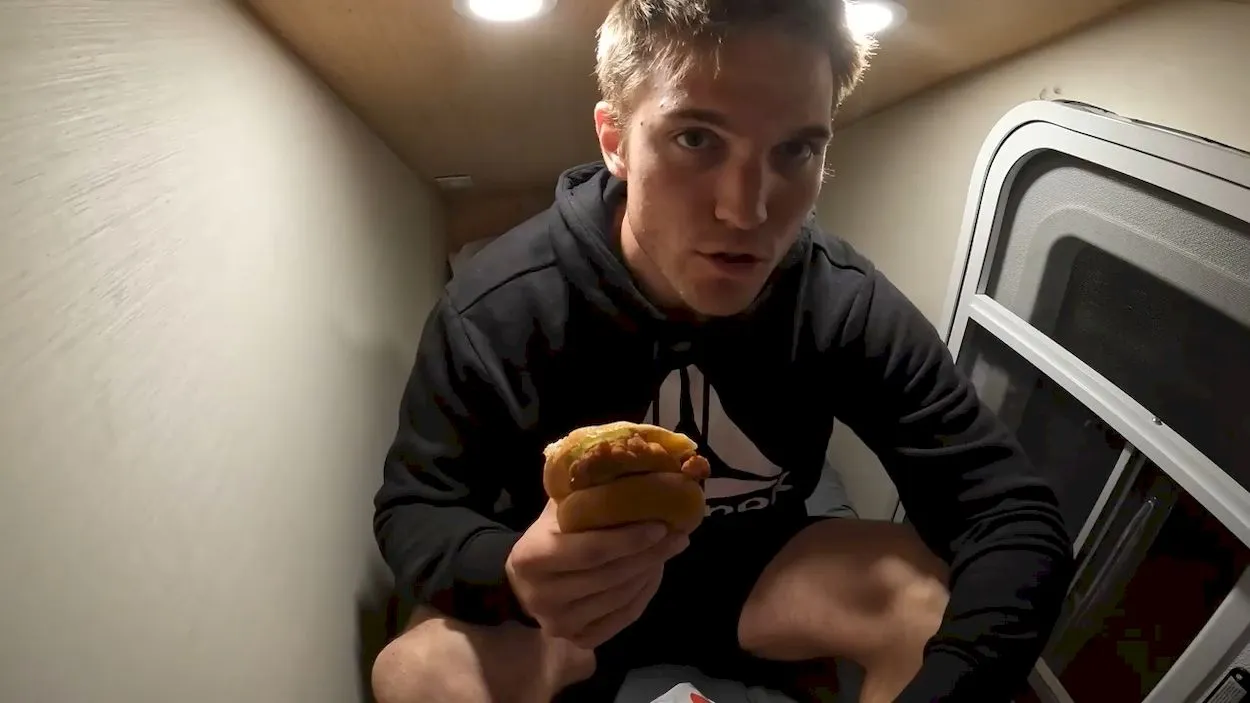
One of the first tasks is installing the TV. Opting for a practical yet affordable option, the creator selects a 24-inch Roku TV from Amazon, adding a touch of modern convenience to the camper’s interior. With a simple installation process, the TV is seamlessly integrated into the space, providing entertainment for those cozy evenings on the road.
With the TV in place, the camper begins to feel more like home. The combination of functionality and comfort creates a sense of coziness within the compact confines of the camper. As the finishing touches are applied, the creator takes a moment to admire their handiwork – a TV and a bike camper, a unique blend of innovation and practicality.
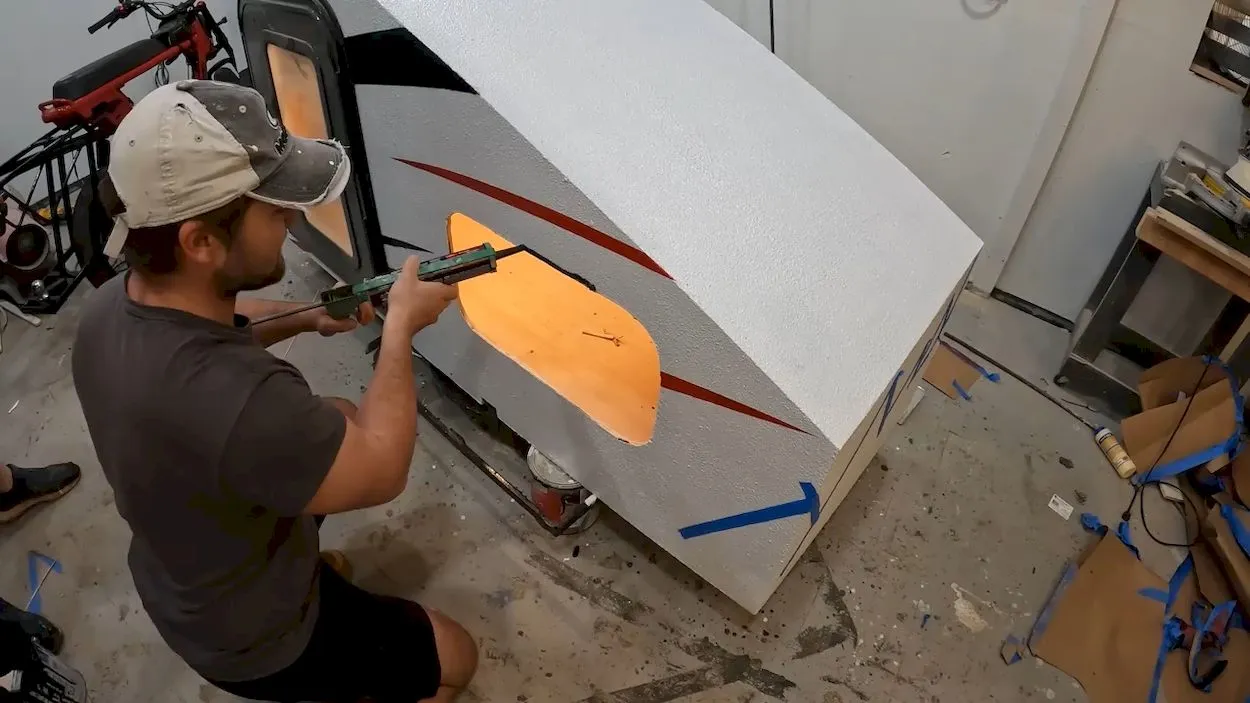
With the exterior bed liner fully cured, it’s time to add a final touch to the camper’s aesthetic – a coat of white enamel paint. The white paint brightens up the interior, giving it a clean and modern look. However, upon completion, the creator notices that the white paint resembles a popcorn ceiling, lacking the desired aesthetic appeal.
Determined to enhance the visual appeal of the interior, the creator decides to make some adjustments. Whether it’s through additional paint layers or creative techniques, they are committed to achieving the desired look. With a blend of creativity and craftsmanship, they set out to transform the interior into a space that is both functional and visually pleasing.
As the paint dries and the final touches are applied, the camper begins to take on a new identity. What started as a simple idea has evolved into a unique and personalized space, ready to embark on adventures both near and far. With the finishing touches complete, the camper stands as a testament to the creator’s ingenuity and dedication, a true masterpiece on wheels.
Finish
After countless hours of hard work and dedication, our camper is finally complete. But this isn’t just any ordinary camper – it’s a revolutionary creation that combines the freedom of biking with the comfort of camping. And the best part? Those wheels are electric, reducing drag to zero and giving us unparalleled control over our journey.
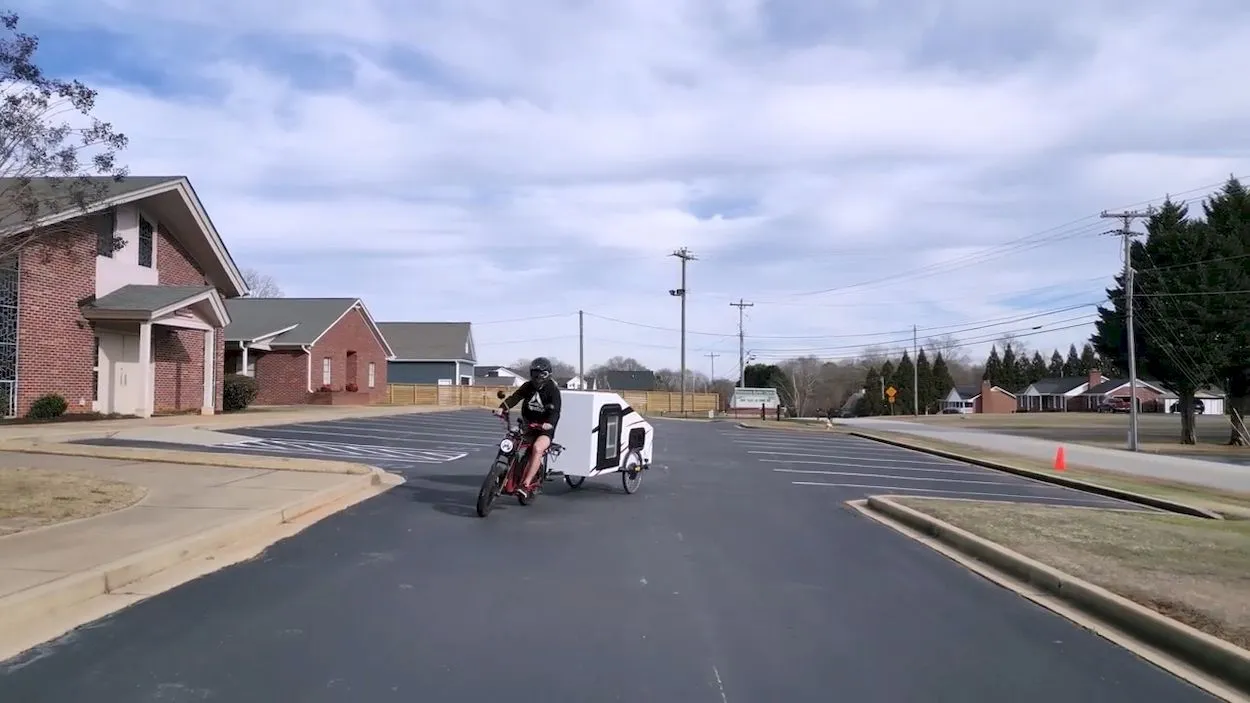
Let me show you how it works. With a simple plug-in connection, the camper is hooked up to my handlebars on the ebike. Pressing the throttle allows me to control the speed of both the camper and the bike independently. It’s a seamless integration that gives me complete freedom to explore.
As I set out on my first ride with the camper in tow, I’m immediately struck by its stability. Even at speeds of 35 mph, it feels rock-solid and secure. And when faced with steep hills, the camper’s power is more than enough to keep us moving forward.
But perhaps the most impressive aspect of this camper is its agility. Thanks to the cleverly mounted hitch, I can take turns with ease, navigating even the tightest corners without missing a beat.
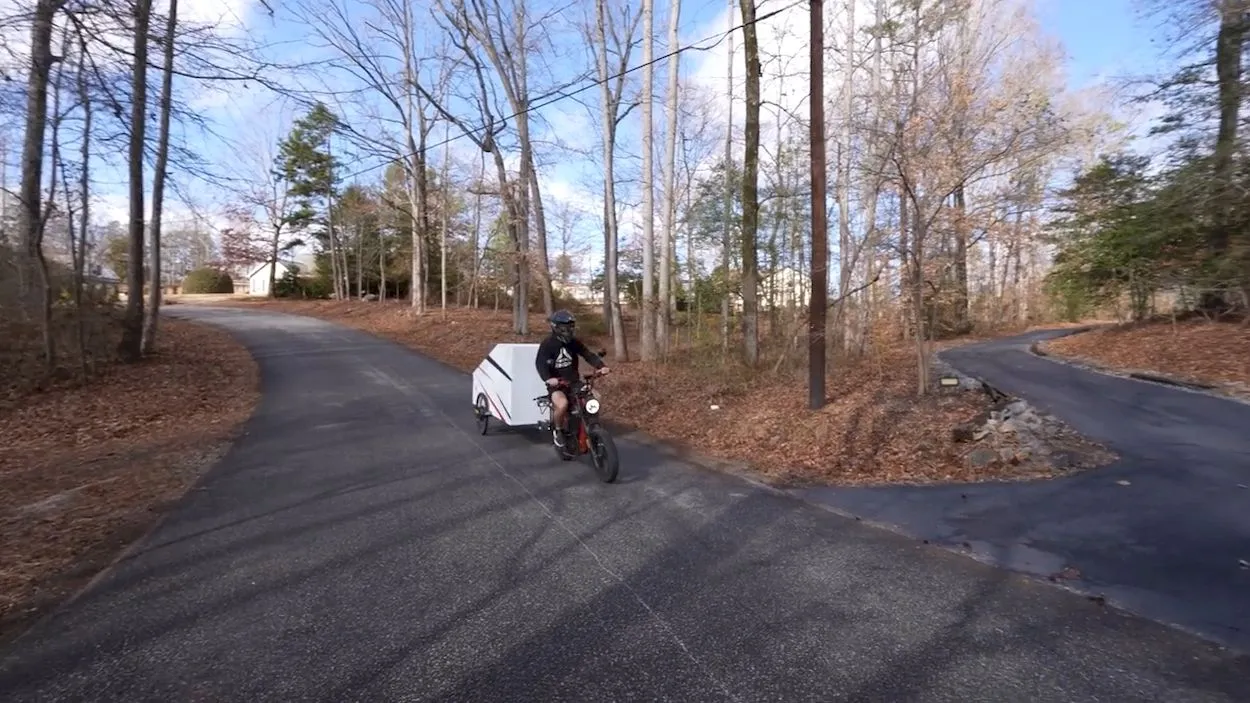
As I continue to ride around town, I can’t help but marvel at the possibilities this camper presents. With power, comfort, and versatility all in one package, I can go anywhere and sleep anywhere. It’s a level of freedom that’s truly liberating.
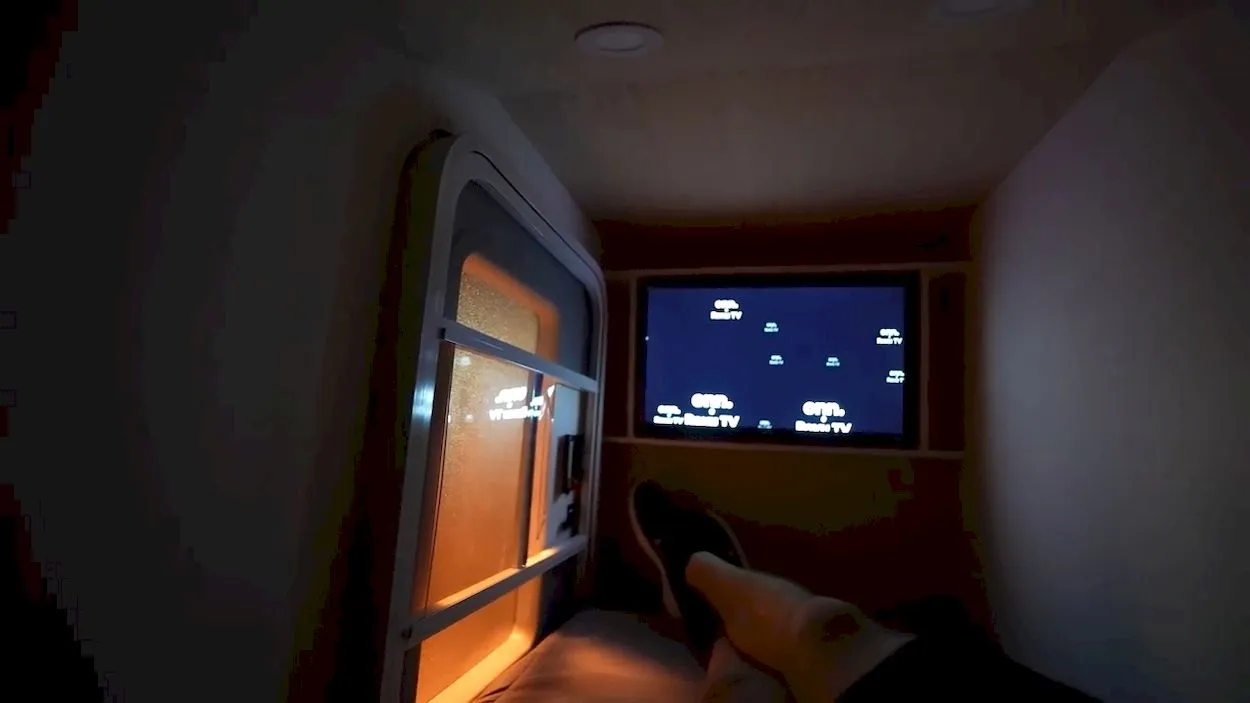
And when it’s time to settle down for the night, the camper transforms into a cozy retreat. With power for my TV and phone, and a comfortable bed to lay in, I’m in no rush to leave. It’s a feeling of contentment unlike anything I’ve experienced before.
Throughout my journey, I’m reminded of just how special this camper is. It’s not just a mode of transportation or a place to sleep – it’s a symbol of innovation and adventure. And as I ride off into the sunset, I know that the possibilities are endless. With this camper by my side, the world is truly my oyster.
I want to extend a heartfelt thank you to everyone who has supported us on this journey. Your encouragement and enthusiasm have fueled our passion for creating and sharing our adventures. And with that, I bid you farewell until the next review. Happy trails!